
One of my favorite parts of the job I do is getting to know so many entrepreneurs who have turn their passions into a source of income. But they, like me, many times realize too late that owning a business is more than just making a thing or offering a service, and getting payed for it. The number of side-tasks, which en up becoming main tasks and consuming most of your time, is endless: taxes, book-keeping, marketing, networking, packaging... it makes you want to quit before you even start! And I have heard so many times: "outsource anything that you hate, or that you are not good at". Well, sure, but if can you afford that when you are just starting? How do you break the cycle?
I will share two pieces of wisdom with you here: 1) you CAN do it all, and 2) you can afford more than you think. If you are interested in how to hire us to photograph your products, skip all the way down there ↓ to 2) .
1) YOU CAN DO IT ALL
It doesn't mean you can do it all perfectly, or that you have the time or energy to do it all, and so in the beginning you will have to be okay with many short nights and a very simplified version of what you would like your business to look like. In the spirit of helping you with that, I want to share with you the one thing I am good at and that I will never outsource myself: making images (of your products).
You can find many tutorials out there on this topic, but I am going to give you the very, very basic steps, the ones that will allow you to take images of your products NOW, without expensive purchases or teaching yourself Photoshop.

Basic set up with a seamless background, for big products.
What you need:
# a spot with a window with good light (preferably right next to a corner), and either:
- a white wall and a piece of white laminate or foam board (if product weight allows)
- white paper (preferably a roll)
# masking tape
# a (second) piece of white foam board
# a decent camera (your cell phone will probably do!)
# time to plan
# a step-stool (optional)
I will describe the steps to take when photographing a small object (for example, jewelry), and give you some tips for each step. If you are photographing something bigger (for example, furniture) you will need a bigger space and bigger paper (like a backdrop paper to create a seamless background).
Step One: Plan
* Decide what you are going to photograph, when (choose the time when the light is best at your chosen location).
* Make a list of products to be photographed and allocate at least 30 minutes to each product.
* Make a list of any prep the product needs: do you need to clean it? Iron it? Make it? Add the estimated "prep time" to each product.
* Make a list of any props (besides the above-mentioned ones) that you may need, and if you need extra time for getting these in order, add that to the "prep time" as well. For example: do you need hangers and a bar to hang that handmade shirt from?
* Make sure your phone (or camera) has enough storage and battery life.
Step Two: (on the day of the shooting) Gather Everything You'll Need
This may sound trivial but please don't skip it. If you, like me, like cooking from scratch, you know that there is a world of difference between gathering all your ingredients before you start following the recipe, and helter-skelter-ly getting them one at a time as you follow the directions. Set up for success!
Step Three: Set up Your Product
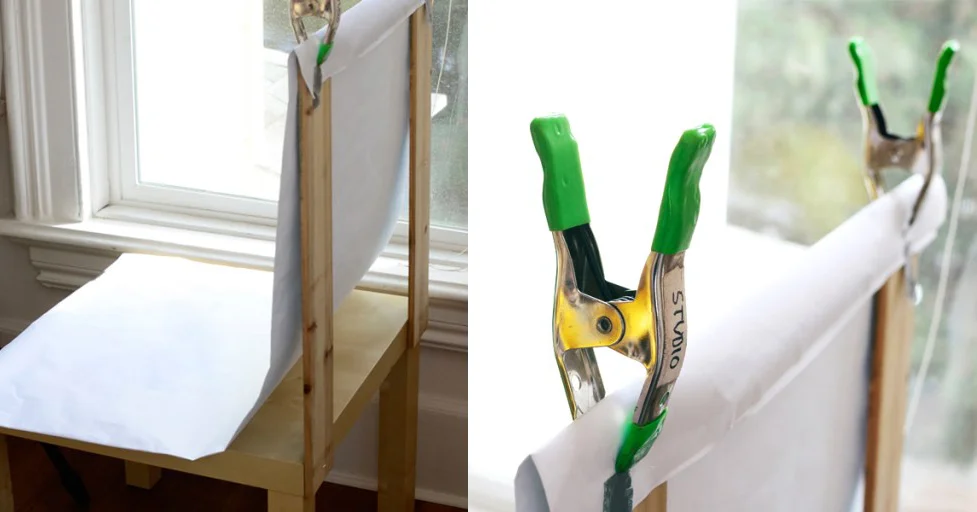
Placing a seamless on a chair for small objects. Clamps work great!

A foam board piece opposite the window acts as a reflector.
* For best results, you want to have the window to the side of your product (see image next to "what you need".)
* If
- you are going for the foam board and wall approach, place one piece of foam board in the corner on the ground, or on top of the appropriate surface (use a small table for a knitted hat, a chair for shoes...)
- you are going for a seamless background, set it up as far as you can. You can tape it to the wall or the back of the chair, depending on the size of the product you are photographing (for this last one, clamps may work better, if you have them.)
* If you are photographing something that hangs, like dangle-y earrings, think of ways you can suspend it in front of the wall or paper: two pencil holders with a string between them, pins on a foam board placed vertically against the wall... many options!
* Place the other piece of foam board opposite the window, so the light bounces back and hits the product from both sides. If you are having trouble keeping it vertical, prop it against the chair or score it with an Exacto and fold it to create a book-like reflector that stands on its own. The larger your product the biggest piece of foam board you'll need. If you find at the last minute that you need to go bigger and you don't have a reflector the right size in hand, hang a white sheet high enough to send light back to your product: this is the bright side of the photography nightmare of having a client show up with a bright green shirt...
* Finally (and this is one of the most important steps), make sure you diffuse the light that's coming in the window. You can use a big piece of paper and tape it over it, or use sheer curtains. This will take care of any "features" the window may have (like cut-ups) and will give you an even, soft light. Even if your paper is not big enough to cover the whole window, just make sure that no direct, bright sunlight is hitting your product.

Make sure you cover the windows, so no direct sunlight hits your product.
Step Four: Photograph!
Take as many shots as you can think of, and then some. If you are trying to experiment with a DSLR, feel free to read my tutorial from last year. Take photos of the highest resolution possible: you can always compress them. But if you are using your phone, it will probably take care of adjusting settings to give you the best results.
Take a close-up, rotate your product to see it from different angles (a tripod/cell phone gadget comes in handy here, so the only thing moving is the product), take a shot from above (use a step stool, and be safe!)... it is better to have too many images than not enough: you will not want to have to set this up all over again for one image you later decide you are missing.
Step Five: Practice and Improve
There are a lot of things to learn and improve. You can get a "Lazy Susan" to place small objects on, build a light box, start playing with how to take good Social Media images by adding little objects or props around your product, or invite a friend over and venture into photographing your product being modeled. In the meantime, this basic set-up will give you great results. Try them!
2) YOU CAN AFFORD MORE THAN YOU THINK!
The trick here is: while you are paying somebody else to do what you hate/are not great at, you need to be hustling at the things you love/are good at, and turning those tasks and hours into money you can use to pay somebody else to do what you hate/are not great at. Makes sense?
I know, for some, even this simple procedure may be too much. So starting this month, Lightfolly is offering product photography services for our local entrepreneurs. We will meet for a vision session, where you will tell us about your brand, your products, and your story. You will decide if you need us to photograph one product, or a whole line, whether you want just product shots or social media and model images too, and we'll work together to take your products to the next level.
Here is what you get with our basic package:
* 1 product shot, on transparent background
* 1 product shot, on a background of your choice
* 1 High Resolution styled image for social media


All for $49 (Packages including model shots start at $75). But we want you to experience the ease of mind of working with you before you commit, so we are offering AN INTRODUCTORY PRICE OF $29 for our basic package ($55 for packages including model shots) if you hire us BY FEBRUARY 2nd.
The examples shown here are for the beautiful, locally made jewelry created by Nadia Kaliszewski, from Big Hollow Designs. Because the Social Media shot is High Resolution, you can crop it in several different ways to use it in various different post, as well as add whatever filters complement your brand. And yes, that is her in the photo below, but you don't have to model your own products if you don't want to: we'll take care of that! Contact us through our page or give us a call at 307-703-8118 to start discussing you investing in your company.


